Introduction to being an Artist
This is a full outline list of what you will be doing to make a webcomic for The Vault!
What is in a comic?
1. Concept and Planning
-
Story synopsis: short and long versions.
-
Themes and tone: horror, romance, fantasy, slice-of-life, etc.
-
Target audience: age range, demographic, interests.
-
Episode/Chapter length and total arc planning.
-
Release schedule: weekly, biweekly, monthly.
2. Script & Storyboarding
-
Full script: dialogue, narration, scene descriptions.
-
Thumbnail sketches: rough layout of each page/panel.
-
Panel breakdowns: composition, camera angles, shot type.
-
Pacing notes: which panels get emphasis, pauses, or page turns.
3. Characters & Design
-
Character sheets: appearance, age, height, build, clothing, personality.
-
Expressions sheet: anger, sadness, happiness, surprise, etc.
-
Poses sheet: common actions, fighting, running, sitting, etc.
-
Outfit variations if story spans multiple arcs or settings.
-
Reference images for consistent drawing.
4. World-Building & Backgrounds
-
Locations: city, forest, interiors, ocean, fantasy worlds.
-
Maps or layout references.
-
Props and objects: recurring items, weapons, furniture.
-
Environmental details: lighting, weather, mood.
5. Art Style & Assets
-
Chosen style: detailed, semi-realistic, manga, cartoonish.
-
Line art style and thickness.
-
Color palette: characters, backgrounds, lighting.
-
Textures and effects: water, fire, smoke, magic.
-
Brushes, tools, and software setup.
6. Lettering & Typography
-
Fonts for dialogue, narration, sound effects.
-
Text bubble style: shape, size, placement.
-
Sound effect design: consistency and visibility.
-
Guidelines for readability on screens (mobile, desktop).
7. Production & Workflow
-
File organization: panels, pages, characters, backgrounds.
-
Layer structure in editing software.
-
Templates for panels and pages.
-
Backup schedule and storage.
-
Time estimates per page or panel.
8. Revision & Quality Checks
-
Proofreading dialogue and narration.
-
Consistency check: character designs, backgrounds, color.
-
Correcting anatomy, perspective, and proportions.
-
Final rendering and optimization for web format.
9. Publishing & Web Setup
-
Export settings for web: file type, resolution, size limits.
-
Upload schedule and CMS setup (WordPress, Webtoon, Tapas, etc.).
-
Thumbnails, cover images, and chapter titles.
-
Accessibility considerations: alt text for images.
10. Marketing & Extras
-
Promotional images or teasers.
-
Social media posts linking to updates.
-
Extra content: sketches, behind-the-scenes, character bios.
-
Reader engagement: polls, Q&A, comments moderation.
Step 1.
Character & Asset Preparation
1. Character Design
-
Full-body drawings of each main and supporting character.
-
Multiple angles: front, side, back, 3/4 view.
-
Facial expressions sheet: happy, sad, angry, surprised, scared, neutral.
-
Key poses: walking, running, fighting, sitting, interacting.
-
Outfit variations for different scenes or arcs.
-
Accessories, weapons, or signature items.
2. Backgrounds & Environments
-
Key locations: homes, city streets, forests, fantasy settings, interiors.
-
Perspective sketches to establish depth.
-
Environmental details: furniture, décor, props, plants, or machinery.
-
Weather and lighting reference sketches: day, night, rain, fog, shadows.
3. Props & Objects
-
Everyday objects characters interact with.
-
Weapons, tools, gadgets, or magical items.
-
Recurrent symbolic objects tied to story or character arcs.
4. Visual References
-
Quick sketches or mood boards for style consistency.
-
Color palette swatches for characters, props, and backgrounds.
-
Textures: water, fire, smoke, magic effects, materials like metal or fabric.
Goal of Step 1:
By the end of this step, the artist should have a complete visual library of characters, backgrounds, props, and stylistic references, ready to be used for panel-by-panel drawing.
Step 2.
Panels, Layouts, and Composition
1. Page Thumbnails & Layouts
-
Create small, rough sketches of each page (thumbnailing).
-
Decide panel count per page based on pacing and scene importance.
-
Experiment with panel shapes and sizes to emphasize action or drama.
-
Plan the flow of the reader’s eye: left-to-right, top-to-bottom, or vertical scrolling for web.
2. Panel Composition
-
Determine camera angles: close-ups, medium shots, wide shots, bird’s-eye, low-angle.
-
Position characters and key objects within panels for clarity and impact.
-
Use overlapping elements or foreground objects to add depth.
-
Highlight focal points to guide attention to emotion, action, or story beats.
3. Perspective & Depth
-
Apply 1-point, 2-point, or 3-point perspective for interiors, streets, and landscapes.
-
Include background, midground, and foreground layers to enhance depth.
-
Maintain consistent horizon lines and vanishing points across panels.
4. Dynamic & Action Scenes
-
Use motion lines, blur, or exaggeration to convey movement.
-
Position characters to make action readable and dramatic.
-
Emphasize key story moments with larger panels or splash pages.
5. Visual Flow
-
Check transitions between panels for smooth reading.
-
Ensure characters and objects maintain continuity between panels.
-
Balance text space with visual elements so panels don’t feel crowded.
Goal of Step 2:
By the end of this step, the artist has detailed layouts and compositions for every page, showing exactly what will be drawn in each panel and how the story will visually flow.
Step 3.
Final Line Art and Inking
1. Clean Line Art
-
Trace over your thumbnails or rough sketches with clean, precise lines.
-
Maintain consistent line weight for characters, props, and backgrounds.
-
Emphasize focal points by varying line thickness (thicker for foreground, thinner for background).
-
Correct anatomy, proportions, and perspective errors from the thumbnails.
2. Detailing
-
Add textures to clothing, hair, and surfaces.
-
Include small background details to make the environment feel lived-in.
-
Refine expressions and gestures for clarity and emotional impact.
3. Panel Borders and Structure
-
Solidify panel edges, ensuring consistent spacing.
-
Adjust or stylize panel shapes if necessary for dramatic emphasis (e.g., jagged edges for action or tension).
4. Special Effects in Line Art
-
Draw motion lines, impact bursts, or magical effects.
-
Add visual cues like speed lines or focus lines to guide the reader’s attention.
-
Indicate shadow placement or light direction with line work if using black-and-white.
5. Consistency Checks
-
Ensure character designs match throughout all panels.
-
Confirm background continuity across scenes.
-
Keep line style consistent to maintain a cohesive visual identity.
Goal of Step 3:
By the end of this step, the artist has clean, polished line art ready for coloring or shading, with every panel fully detailed, visually coherent, and ready for the next stage of production.
Step 4.
Coloring and Shading
1. Base Colors
-
Apply flat colors to all characters, backgrounds, and props.
-
Use a consistent color palette for each character and location.
-
Separate layers for characters, props, and background for easy editing.
2. Shading and Highlights
-
Add shadows to create depth and volume (consider light sources).
-
Apply highlights to hair, skin, and reflective surfaces.
-
Use gradients, cell shading, or soft shading depending on the style.
3. Color Effects
-
Include atmospheric effects: fog, rain, night lighting, underwater tints, etc.
-
Apply glow or magical effects if the story includes supernatural elements.
-
Adjust hue and saturation to match the scene’s mood (warm, cold, tense, calm).
4. Background Coloring
-
Color backgrounds consistently with perspective and lighting.
-
Blend foreground and background layers to create depth.
-
Add details like reflections, texture, or environment effects.
5. Consistency and Style
-
Maintain the same color rules throughout characters, props, and scenes.
-
Keep a reference palette for easy matching across panels and episodes.
-
Ensure readability: colors should not obscure characters, text, or important actions.
Goal of Step 4:
By the end of this step, the artist has fully colored and shaded panels, with consistent lighting, mood, and style, ready for final effects, lettering, and web publishing.
Step 5.
Effects, Final Touches, and Panel Exporting
1. Special Effects
-
Add visual effects like glow, sparkles, smoke, fire, magic, or water ripples.
-
Apply motion blur, speed lines, or impact effects for dynamic action.
-
Integrate environmental effects (rain, fog, dust, lighting flares) to enhance mood.
2. Final Adjustments
-
Refine small details in characters, props, and backgrounds.
-
Check color balance, contrast, and lighting consistency across panels.
-
Make sure all elements are readable and visually clear for web viewing.
-
Correct any lingering anatomy, perspective, or proportion errors.
3. Lettering Prep
-
Leave space for speech bubbles, narration boxes, or sound effects.
-
Adjust line art or background where text will overlay to maintain readability.
4. Panel Cropping & Exporting
-
Crop panels or full pages to the correct webcomic dimensions (Webtoon, Tapas, etc.).
-
Export each panel/page as optimized web-ready files (JPEG, PNG, or WebP).
-
Organize files in folders by episode/chapter and panel number for easy upload.
5. Final Consistency Check
-
Review the entire chapter for flow, continuity, and visual coherence.
-
Make sure character designs, backgrounds, and colors remain consistent.
-
Confirm all special effects and text spaces are aligned with the story.
Goal of Step 5:
By the end of this step, the artist has fully polished, web-ready panels with all effects, shading, and layout finalized, ready to be uploaded for readers.
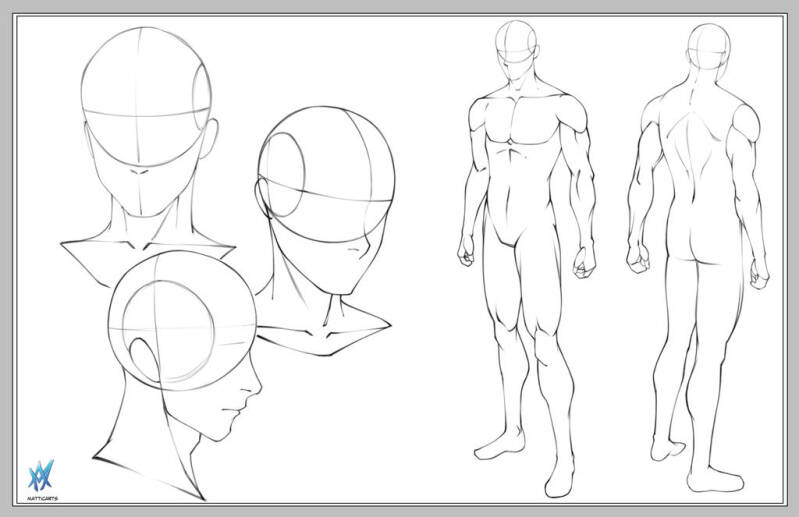
Character Designs
Environment Sketchs

Quick Checklist
Step 1: Character & Asset Preparation
-
Character Design: Full-body drawings, multiple angles (front, side, back, 3/4 view).
-
Expressions: Happy, sad, angry, surprised, scared, neutral.
-
Key Poses: Walking, running, fighting, sitting, interacting.
-
Outfit Variations: For different arcs or scenes.
-
Accessories & Props: Weapons, jewelry, magical items, signature objects.
-
Backgrounds & Environments: Key locations, interiors, exteriors, perspective sketches.
-
Environmental Details: Furniture, décor, props, weather, lighting.
-
Visual References: Color palettes, textures, mood boards for style consistency.
Goal: Complete visual library of characters, props, and environments ready for drawing panels.
Step 2: Panels, Layouts, and Composition
-
Page Thumbnails: Rough sketches of each page with panel count.
-
Panel Composition: Camera angles (close-up, medium, wide, low/high angles), focal points.
-
Perspective & Depth: Foreground, midground, background, consistent vanishing points.
-
Dynamic Scenes: Motion lines, action exaggeration, splash pages for emphasis.
-
Visual Flow: Smooth transitions, continuity of characters and objects.
Goal: Detailed layouts showing exactly what will be drawn in each panel and page flow.
Step 3: Final Line Art and Inking
-
Clean Lines: Trace thumbnails with precise, consistent line work.
-
Line Weight: Thicker in foreground, thinner in background for depth.
-
Details: Textures for hair, clothing, surfaces; refine expressions and gestures.
-
Panel Borders: Solidify panel edges; stylize shapes for dramatic effect.
-
Special Effects in Line Art: Motion lines, focus lines, impact bursts, shadow indications.
-
Consistency Checks: Character designs, backgrounds, and line style uniformity.
Goal: Polished line art ready for coloring and shading.
Step 4: Coloring and Shading
-
Base Colors: Flat colors for characters, props, backgrounds on separate layers.
-
Shading & Highlights: Shadows, highlights, gradients, cell shading, or soft shading.
-
Color Effects: Atmosphere (fog, rain, night tones), glow, magical effects, mood adjustments.
-
Background Coloring: Depth, perspective, lighting, and environmental details.
-
Consistency: Maintain reference palette; ensure readability and style cohesion.
Goal: Fully colored panels with consistent lighting, mood, and style.
Step 5: Effects, Final Touches, and Panel Exporting
-
Special Effects: Glow, sparkles, smoke, fire, magic, water ripples, motion blur.
-
Final Adjustments: Color balance, contrast, lighting, minor corrections in anatomy/perspective.
-
Lettering Prep: Leave space for speech bubbles, narration, and sound effects.
-
Panel Cropping & Export: Correct dimensions for web, optimized file types, organized folder structure.
-
Final Consistency Check: Verify continuity of characters, colors, backgrounds, effects, and layout.
Goal: Fully polished, web-ready panels ready for upload.
Joining The Vault
Yes, its a lot of work. Yes, it takes time. Yes, it takes effort and energy. Yes, it will be a long journey before you see results of your hard work. But at least you are working towards something right? Most can't say that. Don't give up before you have even tried to do it just before you don't see the results on the first post. Keep going. Keep pushing. Because by the end, you will be rewards for your tears and muscle strains from drawing. You'll get the audience that loves your work and you'll go onto greater things.
You started drawing because you enjoy it. Because it either calms you down or gets your mind off the things in life that makes everyone struggle. You are not alone in your efforts!
Introduction to being a writer
Step 1.
Story & Concept Development
1. Core Concept
-
One-line logline: the story in a single sentence.
-
Short synopsis (1–3 paragraphs) summarizing main plot.
-
Long synopsis detailing the story arc, themes, and tone.
-
Genre and subgenre classification (e.g., dark fantasy, romance, horror).
-
Target audience: age range, interests, demographic.
2. World-Building
-
Setting descriptions: city, fantasy world, school, ocean, etc.
-
Rules of the world: magic, technology, social structure, or special laws.
-
Key locations: recurring areas, landmarks, homes, or secret spots.
-
Timeline or history: important events leading up to the story.
3. Themes & Tone
-
Core themes: love, survival, morality, environmentalism, power, etc.
-
Story tone: dark, humorous, suspenseful, emotional, or lighthearted.
-
Moral or philosophical questions explored in the story.
4. Character Planning
-
Main characters: protagonist, antagonist, major supporting characters.
-
Core personality traits, motivations, strengths, and weaknesses.
-
Character arcs: growth, change, or downfall over the story.
-
Relationships and dynamics between characters.
5. Plot Outline
-
Major plot points: beginning, key turning points, climax, resolution.
-
Subplots: side stories, secondary character arcs, or thematic arcs.
-
Conflict types: internal (character struggle) and external (environment, antagonist, society).
-
Pacing considerations: when events escalate, pause, or build tension.
Goal of Step 1:
By the end of this step, the writer has a clear foundation for the story, including concept, characters, world, themes, and plot, ready to move into scripting or chapter planning.
Step 2
Chapter Planning & Detailed Scripting
1. Chapter/Episode Breakdown
-
Decide the number of chapters/episodes in your story arc.
-
Assign main events, conflicts, or reveals to each chapter.
-
Note chapter length in pages or panels (important for pacing).
-
Identify cliffhangers or hooks for each chapter to keep readers engaged.
2. Scene Planning
-
Break each chapter into individual scenes.
-
Determine the purpose of each scene (character development, plot progression, world-building, tension).
-
Note the setting, characters present, and key actions in each scene.
-
Include the emotional tone and intended reader reaction (suspense, humor, sadness).
3. Dialogue & Narration Prep
-
Draft natural dialogue for each scene.
-
Include narration or thought captions if needed.
-
Consider character voice: consistency in tone, vocabulary, and speech patterns.
-
Flag important lines for emphasis or dramatic impact.
4. Panel-by-Panel Scripting
-
For each scene, roughly assign what happens in each panel:
-
Character actions and expressions
-
Key dialogue or narration per panel
-
Camera angles or focus points if relevant (close-up, wide shot, etc.)
-
-
Highlight moments that need visual emphasis (e.g., emotional beats, action points).
5. Pacing & Flow
-
Adjust how much story fits per chapter to keep reading smooth.
-
Balance dialogue-heavy panels with action or visual storytelling.
-
Plan pauses and beats to control suspense and emotional impact.
Goal of Step 2:
By the end of this step, the writer has a detailed, panel-ready script for each chapter, including dialogue, narration, scene flow, and pacing, ready for the artist to illustrate.
Step 3
Character & World Reference Preparation
1. Detailed Character Sheets
-
Full profiles for all major and recurring characters:
-
Name, age, gender, and role in the story.
-
Personality traits, quirks, fears, strengths, and weaknesses.
-
Motivations and goals (short-term and long-term).
-
Relationships with other characters.
-
-
Optional extras: catchphrases, speech patterns, and unique gestures.
2. Visual Reference Notes for Artists
-
Describe character appearances clearly for the artist:
-
Hair style, color, and length.
-
Eye color, shape, and expression tendencies.
-
Clothing style and accessories.
-
Body type, posture, and signature poses.
-
-
Include any magical, supernatural, or non-human traits if relevant.
3. World-Building Reference Sheets
-
Locations and settings: detailed descriptions of recurring areas.
-
Rules of the world: magic systems, technology, social hierarchies, environmental laws.
-
Maps or spatial relationships: city layouts, kingdoms, or important landmarks.
-
Environmental details: lighting, weather patterns, cultural or architectural notes.
4. Timeline & Continuity Notes
-
Track chronological events in the story.
-
Note character development milestones.
-
Keep references for consistency in plot, character actions, and world logic.
5. Conflict & Theme Notes
-
Recap key conflicts for each chapter or arc.
-
Keep track of recurring themes, symbols, or motifs for continuity.
-
Highlight moral or emotional beats the artist should emphasize visually.
Goal of Step 3:
By the end of this step, the writer has complete reference materials for all characters and the world, making the artist’s job smoother and ensuring story and visual consistency throughout the webcomic.
Step 4
Dialogue Polishing & Emotional Flow
1. Refine Dialogue
-
Ensure each character’s voice is distinct and consistent.
-
Adjust word choice, tone, and speech patterns to match personality and age.
-
Remove unnecessary filler lines; make dialogue concise and impactful.
-
Highlight key lines that carry emotional weight or plot significance.
2. Narration & Thought Captions
-
Add internal monologues or narration where needed to clarify plot or emotions.
-
Ensure narration complements the visuals, rather than repeating them.
-
Keep captions concise for easy readability on web panels.
3. Emotional Pacing
-
Plan how tension, suspense, humor, or romance builds across panels.
-
Vary pacing: slow down for emotional beats, speed up for action sequences.
-
Use dialogue and narration to guide the reader’s attention and reactions.
4. Panel-Level Writing Notes
-
Indicate what emotion each character should convey in each panel.
-
Note subtle cues like gestures, expressions, or reactions that the artist should emphasize.
-
Suggest sound effects or visual emphasis if they relate to dialogue or action.
5. Consistency Checks
-
Re-read each chapter for continuity of tone and character voice.
-
Ensure emotional beats match the story arc and build appropriately toward climaxes.
-
Adjust dialogue placement to fit expected panel layout without overcrowding text.
Goal of Step 4:
By the end of this step, the writer has polished dialogue, narration, and emotional flow, ready for the artist to illustrate panels that match tone, pacing, and character interactions.
Step 5
Final Storyboarding & Script Handoff
1. Panel-by-Panel Script
-
Break each scene into individual panels.
-
Include:
-
Character actions and positions
-
Facial expressions and emotions
-
Key dialogue or narration for each panel
-
Notes for important visual cues or dramatic emphasis
-
2. Storyboard Thumbnails (Optional but Helpful)
-
Create rough sketches or diagrams showing panel composition.
-
Indicate camera angles: close-ups, wide shots, overhead, or low-angle shots.
-
Show layout flow for readability: left-to-right, top-to-bottom, or vertical scrolling.
3. Chapter & Episode Notes
-
Highlight major beats, climaxes, or cliffhangers for each chapter.
-
Mark pacing points: where to slow down for emotional impact, or speed up for action.
-
Include notes on recurring motifs, visual themes, or environmental details.
4. Continuity & Reference Integration
-
Cross-reference character sheets, world-building notes, and previous chapters.
-
Confirm all character actions, dialogue, and plot points are consistent.
-
Include reminders for artist regarding special powers, magical effects, or unique visual elements.
5. Script Organization
-
Format script clearly for the artist: panel number, dialogue, action, notes.
-
Keep files organized by chapter/episode for easy access.
-
Include color codes or highlights for high-priority notes if necessary.
Goal of Step 5:
By the end of this step, the writer has a complete, artist-ready script and storyboard, with panel-by-panel guidance, emotional beats, and all references integrated. The artist can start drawing efficiently without guessing story intent, character emotion, or pacing.
Story Boarding Example

Quick Checklist
Webcomic Writing Workflow Checklist
This checklist outlines everything a writer/author needs to prepare before a webcomic is illustrated. It focuses purely on writing and planning, giving a clear roadmap from concept to artist-ready script.
Step 1: Story & Concept Development
-
Core Concept: One-line logline, short and long synopsis, genre, target audience.
-
World-Building: Settings, rules of the world, key locations, timeline/history.
-
Themes & Tone: Core themes, story tone, moral or philosophical questions.
-
Character Planning: Main characters, personality traits, arcs, relationships.
-
Plot Outline: Major plot points, subplots, conflict types, pacing considerations.
Goal: Establish a strong story foundation including concept, characters, world, and plot.
Step 2: Chapter Planning & Detailed Scripting
-
Chapter Breakdown: Number of chapters, main events, cliffhangers/hooks.
-
Scene Planning: Scenes per chapter, purpose, setting, characters, tone.
-
Dialogue & Narration: Draft natural dialogue, narration, character voice consistency.
-
Panel-by-Panel Scripting: Character actions, expressions, camera angles, visual emphasis.
-
Pacing & Flow: Balance dialogue and action, adjust timing for suspense or emotional impact.
Goal: Create detailed, panel-ready scripts for each chapter.
Step 3: Character & World Reference Preparation
-
Character Sheets: Profiles, personality traits, relationships, arcs.
-
Visual References for Artists: Hair, eyes, body type, clothing, unique traits.
-
World-Building References: Locations, rules, maps, environmental/cultural notes.
-
Timeline & Continuity Notes: Events, character development, story consistency.
-
Conflict & Theme Notes: Key conflicts, recurring themes, visual emphasis cues.
Goal: Provide complete references so the artist can maintain consistency and understand story intent.
Step 4: Dialogue Polishing & Emotional Flow
-
Refine Dialogue: Ensure distinct character voices, concise and impactful lines.
-
Narration & Thought Captions: Complement visuals, clarify plot/emotions, concise for readability.
-
Emotional Pacing: Plan suspense, humor, romance, and tension per panel.
-
Panel-Level Writing Notes: Include gestures, expressions, subtle cues, and sound effect suggestions.
-
Consistency Checks: Verify tone, character voice, and emotional beats across the chapter.
Goal: Have polished dialogue, narration, and emotional pacing ready for illustration.
Step 5: Final Storyboarding & Script Handoff
-
Panel-by-Panel Script: Actions, expressions, dialogue, and visual notes per panel.
-
Storyboard Thumbnails (Optional): Rough sketches showing panel composition, camera angles, layout flow.
-
Chapter & Episode Notes: Highlight climaxes, pacing, and cliffhangers.
-
Continuity & References: Cross-reference character sheets, world-building, and previous chapters.
-
Script Organization: Format clearly by panel, chapter, and include high-priority notes for the artist.
Goal: Deliver a complete, artist-ready script and storyboard for efficient illustration, ensuring the story, pacing, and emotional beats are clear.
Artist and Writer Phases
Webcomic Production Workflow Roadmap
This roadmap shows everything that goes into creating a webcomic, divided by Writer/Author tasks and Artist tasks, step by step. It’s ideal for teams or solo creators to understand the full scope of work.
Phase 1: Story & Concept (Writer)
Step 1: Story & Concept Development
-
Core concept: logline, short and long synopsis, genre, target audience.
-
World-building: settings, rules, key locations, history.
-
Themes & tone: core themes, story tone, moral questions.
-
Character planning: personalities, arcs, relationships.
-
Plot outline: major events, subplots, conflict, pacing.
Goal: Strong story foundation ready for detailed scripting.
Phase 2: Chapter & Scene Planning (Writer)
Step 2: Chapter Planning & Scripting
-
Break story into chapters/episodes with key events.
-
Scene planning: purpose, characters, setting, tone.
-
Draft dialogue and narration.
-
Panel-by-panel script: actions, expressions, camera focus, visual emphasis.
-
Plan pacing: balance dialogue and action, control suspense/emotion.
Goal: Detailed, panel-ready script for the artist.
Phase 3: Character & World References (Writer)
Step 3: References
-
Character sheets: profiles, personality, arcs, relationships.
-
Visual references for artist: hair, eyes, body type, clothing, special traits.
-
World references: locations, maps, rules, environmental/cultural notes.
-
Timeline & continuity notes.
-
Conflict and theme notes: visual emphasis cues.
Goal: Provide artist with all references to maintain consistency.
Phase 4: Dialogue Polishing & Emotional Flow (Writer)
Step 4: Dialogue & Emotional Beats
-
Refine dialogue for clarity, voice, and impact.
-
Add narration or thought captions where needed.
-
Plan emotional pacing per panel and chapter.
-
Include notes for gestures, expressions, and sound effects.
-
Ensure tone, voice, and emotional beats are consistent.
Goal: Polished, artist-ready dialogue and storytelling flow.
Phase 5: Storyboard & Script Handoff (Writer)
Step 5: Final Script & Storyboarding
-
Panel-by-panel breakdown with dialogue, actions, and expressions.
-
Optional storyboard thumbnails for layout and camera angles.
-
Notes for pacing, climaxes, and cliffhangers.
-
Continuity checks with characters, world, and previous chapters.
-
Organized script for easy artist reference.
Goal: Complete artist-ready script with panel instructions.
Phase 6: Visual Preparation (Artist)
Step 1: Character & Asset Preparation
-
Full-body drawings, multiple angles, expressions, poses, outfit variations.
-
Props, weapons, magical items, and signature objects.
-
Key locations, interiors/exteriors, environmental details.
-
Color palettes, textures, and style references.
Goal: Complete visual library ready for panels.
Phase 7: Panels, Layout & Composition (Artist)
Step 2: Thumbnails & Layouts
-
Rough page sketches, panel count, and composition.
-
Camera angles, focal points, perspective, depth.
-
Dynamic scenes and visual flow between panels.
Goal: Detailed layouts showing panel composition and flow.
Phase 8: Line Art & Inking (Artist)
Step 3: Final Line Art
-
Clean lines, consistent weight, refined expressions and gestures.
-
Panel borders finalized, optional stylized edges.
-
Motion lines, impact bursts, and line-based effects.
Goal: Polished line art ready for coloring.
Phase 9: Coloring & Shading (Artist)
Step 4: Coloring & Shading
-
Flat base colors for characters, props, backgrounds.
-
Shadows, highlights, gradients, atmospheric effects.
-
Color consistency, mood, and readability across panels.
Goal: Fully colored panels with consistent style and mood.
Phase 10: Effects, Final Touches & Exporting (Artist)
Step 5: Final Touches & Web Prep
-
Add special effects (glow, fire, smoke, motion).
-
Final adjustments: color balance, contrast, minor fixes.
-
Leave space for dialogue, captions, and sound effects.
-
Crop and export panels/pages in web-friendly formats.
-
Final continuity check across chapter.
Goal: Web-ready, polished comic panels ready for publishing.
This roadmap gives creators a full view of the entire webcomic process, showing both writing and drawing tasks and how they connect, so teams or solo creators can plan time and effort accurately.
Create Your Own Website With Webador